

Evan Burton
-
Posts
4,420 -
Joined
-
Last visited
-
Days Won
16
Content Type
Profiles
Forums
Events
Store
Posts posted by Evan Burton
-
-
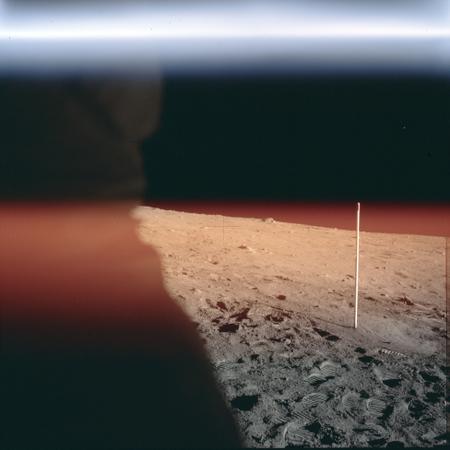
WHOSE FOOTPRINT IS THIS?
This is another one where I have no real idea what point Jack is trying to make. That there are bootprints in the soil? Your guess is as good as mine.
The image is probably AS15-86-11671, the stereo companion to AS15-86-11670.
The bootprints are from Jim or Dave - I don't know which; perhaps both.
The device in the image is called a gnomon. A gnomon is a rod mounted on a tripod in such a way that it is free to swing in any direction and indicates the local vertical; it gives Sun position and serves as size scale. Color and reflectance scales are provided on the rod and a colorimetric reference is mounted on one leg.
The rock in the image was called the Genesis Rock, and was probably the most famous of all the lunar samples collected. The sample was 4.5 billion years old according to geologists.
ALSJ:
145:41:19 Scott: Get that unusual one. (Pause) Here's some dense...And there's another unusual one; look at the little crater here, and the one that's facing us. There is a little white corner to the thing.145:41:34 Allen: Okay, Dave. Get as many of those as you can, and you might be watching for a place where you think the rake might help you.
145:41:43 Scott: Yeah. I think we can probably do a rake here, Joe.
145:41:47 Allen: Okay, sounds like a good place....
145:41:48 Scott: Okay, there's a big boulder over there down-Sun of us, that I'm sure you can see, Joe, which is gray. And it has some very outstanding gray clasts and white clasts, and oh, boy, it's a beaut! We're going to get ahold of that one in a minute.
145:42:07 Irwin: Okay, I have my pictures, Dave.
[The sample with the "white corner on the thing" is one of the best known of all Apollo samples, 15415, a 269 gram piece of pure anorthosite. Reporters covering the mission almost immediately named it the Genesis Rock. Interestingly, it was sitting up off the surface on a pedestal of soil. Readers should note that, during the drive back to the LM on EVA-1 at 123:56:52, Dave noticed another rock on a pedestal.]
[Jim's down-Sun "before" pictures are AS15-90- 12227 and 12228. In 12227, Dave is standing quite close to the gnomon. Although the pedestal is a little washed out in this picture, the Genesis Rock, the white object, is quite obvious. Jim moved several steps to his right to take 228, which shows Dave holding the tongs in his left hand. The Station 7 boulder is in the background.]
[Dave's cross-Sun "befores" are AS15-86- 11670 and 11671. David Harland has assembled a mosaic of Genesis Rock "befores" and "afters".]
-
SAME BACKDROP - DIFFERENT SCENE
Same mistake Jack makes over and over and over.
AS15-82-11057 was taken from some distance west of the LM, looking southeast. (Look at a larger copy of the image, and you can see the LM porch and ladder - the west side)
AS15-88-11863 was taken close to the north of the LM, looking south-southeast.
The 'hills' are over 4km in the distance.
-
APOLLO 15 - COLOR OR BLACK/WHITE?
This is easy to answer - if you do some research.
AS15-92-12451 (the B&W image) was taken at 148 hrs 57 mins.
148:56:51 Irwin: Yeah. (Pause) Okay, I'm taking you again, boss.148:56:56 Scott: Okay.
[The TV image brightens as Dave salutes.]
148:56:58 Irwin: Oh, you look colorful.
148:56:59 Scott: How about that? Even with the dirt, huh? (Pause)
148:57:05 Irwin: Okay.
[Dave hops off camera to the left.]
[Jim took four pictures of Dave, AS15-92- 12448 to 12451. Frame 12451 is the best of these. Note the footprints and Rover tracks in the crater to Dave's right. This is the last surface picture on magazine 92. The remainder of the magazine was used in orbit.]
148:57:07 Scott: You like that flag there, Joe?
148:57:10 Allen: It's beautiful.
148:57:15 Scott: Yeah. We think it's pretty nice, too. (Long Pause)
The colour image, AS15-88-11863, was taken at 163 hrs 58 mins, 15 hours later.
163:58:27 Scott: I know it! (Long Pause)[before taking Dave's picture, Jim takes two photos of the Rover. In AS15-88-11861, Jim is using his scoop to get his camera at the proper distance from the side of the Rover console for a close-up of a sign affixed to it. Note the SCB on the floor boards on the left and the footrests on the right. An enhanced detail of the area covered by the shadow of Jim's helmet shows Dave's camera with the label "CDR". For 11862, Jim has raised his aim to get a photo of the sign, which reads "Man's First Wheels on the Moon, Delivered by Falcon, July 30, 1971." The signatures of the three crewmembers are at the bottom. In the background, we can see Dave's RCU and, on the top of it, the small warning-flag windows and the large Mode switch. He is not wearing his camera. Note the "Red Apple", below the RCU, with which he would open his purge valve in the case of an emergency requiring use of the OPS. As note by Journal Contributor John 'Eagle-Eye' Pfannerstill, Dave affixed the sign at 163:42:00. Pfannerstill also notes that, by the time we get our next good view of the righthand side of the console, when Dave and Jim reach Station 9a at Hadley Rille, the sign has fallen off.]
[Jim bounds into view, using an easy, loping stride. Fendell stops the pan to watch Jim take a picture of Dave, 11863. Compare the appearance of Silver Spur at the upper left with its appearance in AS15-87- 11748, which is a frame from Dave's SEVA color pan taken at 106:58:27.]
So, no, there are no "whistleblowers" at work here. It's all quite simple if you do your homework.
-
WITH AND WITHOUT HASSELBLAD CAMERAS
What happened to the camera?
Jim Irwin's camera had the colour film magazine in it. Dave Scott's had a B&W magazine. They wanted colour photos of each other.
Jim took a photo of Dave (Dave is still wearing his camera with the B&W magzine fitted).
They changed places, and Dave took a photo of Jim.... with Jim's camera and the colour magazine fitted.
From the ALSJ:
163:58:11 Irwin: One thing, Dave, before you leave.[Jim is reminding Dave that they haven't taken each other's pictures with color film.]
163:58:14 Scott: What? (Pause) Yeah. (Pause) Get my camera.
163:58:26 Irwin: I've got the color.
163:58:27 Scott: I know it! (Long Pause)
[before taking Dave's picture, Jim takes two photos of the Rover. In AS15-88-11861, Jim is using his scoop to get his camera at the proper distance from the side of the Rover console for a close-up of a sign affixed to it. Note the SCB on the floor boards on the left and the footrests on the right. An enhanced detail of the area covered by the shadow of Jim's helmet shows Dave's camera with the label "CDR". For 11862, Jim has raised his aim to get a photo of the sign, which reads "Man's First Wheels on the Moon, Delivered by Falcon, July 30, 1971." The signatures of the three crewmembers are at the bottom. In the background, we can see Dave's RCU and, on the top of it, the small warning-flag windows and the large Mode switch. He is not wearing his camera. Note the "Red Apple", below the RCU, with which he would open his purge valve in the case of an emergency requiring use of the OPS. As note by Journal Contributor John 'Eagle-Eye' Pfannerstill, Dave affixed the sign at 163:42:00. Pfannerstill also notes that, by the time we get our next good view of the righthand side of the console, when Dave and Jim reach Station 9a at Hadley Rille, the sign has fallen off.]
[Jim bounds into view, using an easy, loping stride. Fendell stops the pan to watch Jim take a picture of Dave, 11863. Compare the appearance of Silver Spur at the upper left with its appearance in AS15-87- 11748, which is a frame from Dave's SEVA color pan taken at 106:58:27.]
Why can't we see Irwin's OPS antenna (on top of the PLSS backpack)?
Simple - it wasn't deployed. They didn't always have them up - especially when sitting in the LRV.
ALSJ:
163:55:48 Allen: Jim, when it's convenient for you, I guess we're going to need Dave's PLSS antenna deployed.163:55:57 Irwin: Okay. (Long Pause)
[in a view of the PLSS/OPS from the back, the antenna is on the top left of the OPS. A restraining loop is sketched in on the top right. In a view of the PLSS/OPS from the front, the antenna has been folded down across the top of the OPS and the tip has been inserted under the restraining strap.]
163:56:28 Scott: Can you move away just another step, Jim?
163:56:30 Irwin: Okay.
163:56:31 Scott: Bend over good, here. (Pause) Okay. Whew. That bag is all folded up so much, I can't get to it. Now you can get my antenna. (Pause)
[Dave faces Jim and bows low so that Jim can get at his OPS antenna.]
163:56:48 Irwin: Okay. It's deployed.
163:56:49 Scott: Okay. My bag. Top's not closed. (Long Pause)
[Dave closes the top of Jim's SCB and then presents the left side of his PLSS. Only Dave's head is visible at the right edge of the TV image.]
163:57:32 Allen: Dave, while you're getting buttoned up there, when you move out to the drill site, we'll want you to photograph the collapsed material in the trench and do a photo pan around the core there. And, Jim, maybe you can see if maybe you can pull the core out of the ground while Dave's doing that, and then he'll give you a hand.
[Fendell pans left.]
163:57:59 Irwin: (Responding to Joe) Okay. (To Dave) You're secured there, Dave.
-
APOLLO 15 IN A DIFFERENT LIGHT
The tracks are different because AS15-86-11603 (the top image) was taken at 125 hrs 45 mins. The image was taken from just west of the LM, and you can see the LM shadow. The LRV is just north of the LM.
AS15-87-11835 (the bottom image) was taken at 147 hrs 27 mins, so the tracks in 11835 weren't there when the top image (11603) was taken.
Jack asks: "... and in totally different light. How is it possible for sunlight to change this much?"
Because there is over 20 hours difference between when the images were taken. As has been explained before, in that time the sun has risen over 10 degrees higher in the sky and the landscape is now lighted differently.
Jack asks: "Also, the shadow of the LEM is in the top photo. Where is the LEM in the bottom picture?"
The top image (11603) was taken from just west of the LM.
The bottom image (11835) was taken from south-east of the LM. The sun is in the east, shadows fall to the west, so the LM shadow isn't visible because the LM is to the left (north-west), out of frame.
From the ALSJ:
AS15-87-11835147:27:12 This is a frame from Jim Irwin's pan taken from a point southeast of the LM after the EVA-2 traverse. It is centered on Mt. Hadley, which is in full Sun. Note the well-defined imprints made by the chevrons on the Rover tires. Scan by Kipp Teague.
-
HOW SHOULD A MOON CRATER BE LIGHTED?
AS15-86-11602 was taken at 125 hrs 45 mins.
The other image Jack has shown, AS15-88-11866 (shown in previous post), was taken at 163 hrs 59 mins.
In 11602, the sun was relatively low in the sky (and to the left of the image), so the shadow helps highlight relief detail.
In 11866 (just over 38 hours later), the sun is nearly 20 degrees higher - and still to the left of the image. The relief detail does not show up so much. If you look at the high resolution version of AS15-88-11866 you can see St George Crater to the right of the LM and behind the LRV.
Jack asks :WHERE IS THE FLAG SHADOW?
As I pointed out before, Jack, AS15-86-11602 was taken at 125 hrs 45 mins. The flag wasn't deployed until 148 hrs 54 mins. There is no shadow because it hasn't been deployed yet. If you bother to research that facts, Jack, you wouldn't make such mistakes.
-
OH SAY CAN YOU SEE
Same errors over and over.
In Jack's 'A' section, there is no flag.... because it hasn't been deployed yet. It was NOT the first thing the astronauts did.
A15.1472712pan12 was taken at 147 hrs 12 mins.
The flag wasn't deployed until 148 hrs 54 mins (see previous post).
Image 'D', which Jack hasn't labelled, is AS15-88-11928.
Remember the LM orientation? If you are standing at the hatch looking out, that's west. To your right is north, to your left south, and behind you is east. The eastern side of the LM is the one that has the 'big flat side' on the ascent stage.
Let's look at Jack's image 'B', which is AS15-88-11866:

AS15-88-11866
Look at the LM. See the 'porch' and ladder on the right-hand side? That's the western side of the LM.
You can see that the flag is deployed to the NORTH of the LM.
Now, have a look at AS15-88-11928 (image 'D') again.
We are east of the LM. To our right is north - and there is the flag.
-
WHERE'S THE FLAG?
Jack shows you AS15-88-11866 which shows Jim Irwin saluting with the flag, LM, and LRV all in frame.
He then says the next image is AS15-92-12447.... but it's not.
Here is AS15-92-12447:

AS15-92-12447
Well, how about that. Jim, the flag, the LM, and the LRV.
I looked through all the B&W images, and I couldn't find the image that Jack showed.
Then I went through the colour images, and I found what Jack ACTUALLY has shown us is a composite image made up of AS15-86-11600 and AS15-86-11601, taken at 125 hrs 45 min. Note that time - 125 hrs 45 mins.
Now, Jack says that the first thing they did was deploy the flag. WRONG!
From the ALSJ:
147:11:07 Allen: ...and we're going to ask you to deploy the flag a little later, and you probably will need the hammer for that.147:11:16 Irwin: No, I won't need the hammer (because of the soft soil).
147:11:17 Allen: Okay.
*********************************
147:27:17 Allen: Okay, Jimmy. Sounds good. We want you to deploy the flag after you finish the photography. And, we're wondering at the moment where the two empty core tubes are. If they are still in bag 5. we'll want you to carry them in your hand out toward the ALSEP station later on.
[The Apollo 15 U.S. flag is stowed in the MESA.]
**********************************
147:28:32 Allen: And, Jim, you just could get the flag out; don't necessarily deploy it. We'll get that later when the TV's back at Falcon. And keep me posted on your progress...
147:28:43 Irwin: Okay. Well, listen...
147:28:44 Allen: ...here. When you finish pulling the flag out of its holder, but not yet deployed, we'll ask you to walk on out to the ALSEP site.
[Fendell is looking up-Sun and the dark Rover tracks extending out from the LM are quite evident in the TV picture Over the back of the Rover, we can see some movement at the LM. This is probably Jim getting the flag out of the MESA. Fendell starts to pan counter-clockwise.]
************************************
147:30:24 Irwin: Joe, I have the flag unpacked here, but not deployed.
147:30:33 Allen: That's...
147:30:34 Irwin: I may...
147:30:35 Allen: ...exactly right, Jim. We want you now to proceed on out toward Dave, and be back with you in a minute.
147:30:42 Irwin: You want me to carry the staff and the flag out there, huh?
147:30:46 Allen: Negative, negative, leave it near the LM. We'll pick it up a little later when we come back to the Falcon. Just leave it there in a convenient place.
147:30:53 Irwin: Oh. Okay. (Chuckles) I thought I was going to be able do the Station 8 with the flag waving in the background.
****************************************
148:37:00 Allen: Dave, we've got a lot of time. [/b]We're going to deploy the flag now[/b] and we need the TV please. (Jim laughs)
148:37:13 Scott: Okay, Joe.
******************************************
148:50:46 Allen: Jim, this is Houston.
148:50:51 Scott: Okay, go ahead, Joe.
148:50:53 Allen: Roger, Jim. At your leisure, we'd like you to deploy the American flag, please.
148:51:02 Irwin: Okay. (Pause) We ought to keep that camera out, Dave.
148:51:09 Scott: (Laughing) I'm getting it out right now. (Pause)
[Jones - "Sounds like nobody's really thinking ahead back in Houston."]
[scott - "You have everything packed, and then they decide to do the flag. Now you have to unpack the cameras."]
148:51:14 Irwin: One with a color mag. (Chuckles) (The CDR camera) has black-and-white, though.
[The magazine on the CDR camera is Oboe, a B&W mag.]
148:51:19 Scott: It does? (I'll) fix that, if we've got plenty of time. Which one works? Mine or yours?
148:51:30 Irwin: Yours.
148:51:33 Scott: Okay.
[Dave is taking equipment out of the ETB and is putting it on the MESA.]
148:51:35 Scott: Why don't you get started; I'll take care of this. (Long Pause)
[While Dave rummages in the ETB looking for a color magazine, Jim goes to the back of the Rover to get the hammer. He is carrying the flag staff. A detailed discussion of the Apollo 11 flag deployment can be found in Anne Platoff's 'Where No Flag Has Gone Before'. The only major difference from Apollo 11 is that the Apollo 15 flag was stowed in the MESA. Jim unpacked the flag at 147:28:32]
148:52:18 Irwin: I'll take the staff out (to the deployment spot), Dave.
148:52:20 Scott: Yeah.
148:52:21 Irwin: Drive it if I need to. (Pause)
148:52:30 Scott: Yeah, we don't have any color.
148:52:33 Allen: Dave, we'll get color next time no problem...
148:52:34 Scott: Any color film left, Joe?
148:52:35 Allen: ...you've got a beautiful color TV camera looking at you.
148:52:40 Scott: Oh. Okay. (Pause)
148:52:45 Irwin: That's a shame.
148:52:47 Scott: Yup. I hate black and white.
[b&W gives better resolution and better-defined response to light levels, both features of importance for scientific purposes. On the other hand, B&W can't show the dramatic appearance of color on the otherwise grey Moon.]
[Fendell starts panning counter-clockwise.]
148:52:50 Allen: And, Jim, if possible, we'd like for you to come around north of the Rover there to deploy it, and we're tracking the camera that direction.
148:53:00 Irwin: You tell me when I'm in a good position.
148:53:02 Scott: Hey, hey. Over here, Jim!
148:53:03 Irwin: It would be better to have the...
148:53:05 Scott: Yep.
148:53:06 Irwin: ...the LM as a...
148:53:08 Scott: Right here where we usually do it.
148:53:10 Irwin: Or Hadley.
148:53:11 Scott: Huh?
148:53:12 Irwin: Have Hadley in the background.
[Dave comes into view, running past the Rover. He stops and scuffs a mark on the ground.]
148:53:13 Scott: Sure, right there. (Pause)
[Dave moves out of the way.]
148:53:17 Allen: Beautiful right there!
148:53:20 Irwin: Suppose that's too...(Stops to listen to Joe) (Long Pause)
[scott - "Before we went, we staged the orientation of the flag and the Rover in the simulator building at the Cape. We had a plan on where to put everything, and the only problem was, when we finally got to it, the Rover was facing the flag instead of sideways. And I think that's because they were concerned about (battery) temperatures. But, other than that, the location of where Jim was and the flag was and the LM and the Rover was all staged before we went."]
[Jim puts the staff on the scuff mark and leans on it.]
148:53:44 Irwin: Okay, I'm pushing the staff in.
148:53:46 Scott: Okay. (Pause)
[Jim gets the staff in about 6 inches (15 cm).]
148:53:59 Irwin: I'll hit it a few times so it'll stay up here for a few million years.
148:54:02 Scott: That's a good idea. (Pause)
[Jim drives the staff another 10 to 20 cm into the ground with six blows delivered with the side of the hammer. He grips the hammer with his thumb about 10 cm above the head.]
148:54:07 Irwin: Of course, it might make it too low. No, I don't think so. (Long Pause)
[Jim takes the hammer to the back of the Rover for stowage and, off-camera, unfurls the flag. The flag is attached to telescoping crossbar which will hold the flag out from the staff. The crossbar is attached to the top of the staff with a lokcing hinge.]
148:54:28 Scott: Pretty. You've got to admit. (Pause) Okay. (Long Pause)
[Jim comes back into view with the flag fully assembled. He puts the upper staff into the lower section.]
148:55:08 Scott: Let's see.
148:55:09 Irwin: Probably want to swing it around perpendicular to the (TV) camera, huh?
148:55:15 Scott: Okay! It's pretty good! Why don't you stand there?
[because the flag is translucent and is ENE of the TV, it is the brightest object in the scene and forces the automatic iris to close almost all the way. Dave and Jim are nearly lost in the resulting darkness.]
148:55:21 Irwin: Let me get up on the high part.
[Jim gets up on a slight rise east of the flag.]
148:55:23 Scott: Okay. Gee, I wish we had color (film).
148:55:24 Irwin: Yeah.
148:55:27 Allen: We'll have color tomorrow, Dave...
148:55:28 Scott: That's great just to look at it there.
148:55:29 Allen: ...Saved it especially for you. (Pause)
148:55:33 Scott: (Taking pictures) Okay. (Pause) Okay. That a boy. (Pause) Okay. I've backed up here so I get all of that in there. There, that's good. Good. Got the mountain, got the LM. Great.
[While Jim salutes, Dave takes four photos, AS15-92- 12444 to 12447. Frame 12447 is the best of these.]
*******************************************
They deployed the flag at 148 hrs 54 mins - over 23 hours after Jack's composite images were taken. AS15-88-11866 was taken at 163 hrs 59 mins.
Research, Jack - research.
-
Since I've been invited into this topic, I'll make some thoughts known. I can't comment on the validity of Mr Costella's work because, as I have said many times, I don't have the necessary knowledge of the complex issues involved in the debate to make a meaningful contribution. At best, they'd be speculation by an uninformed observer.
I do find interesting the comments made by Mr Costella regarding what he can or cannot do. To me, it doesn't make sense.
When you are granted access to official information, it is on the understanding that it will not be released to unauthorised persons or discussed with persons who do not have the necessary 'need to know' and clearance.
Part of gaining this access is to undergo a security assessment to determine if you are a fit and proper person to be granted access. Your background is discussed, as well as your political views, associations, and beliefs. If your views are incompatible with security guidelines, then you'd most likely be denied access - or your access would be only within certain areas.
So how does this relate to Mr Costella's JFK research? I'm not sure.
He would not be allowed to discuss conclusions he has reached that are based on his official work or information gained as part of his official duties. He should not discuss his duties.
If it was felt that his JFK research somehow compromised his position, he would most likely be asked to remove that research from the public domain and cease participation in discussing the topic. I find it unlikely that he'd be allowed to maintain a public webpage but not discuss the contents.
Sometimes you'd not comment on matters that might relate to employment because they might be interpreted as being an 'official' position from your employers. In most cases, as long as it was made clear that this was a personal opinion and did not necessarily reflect the views of your employer, there would be no problem (although statements to the media would be different). I don't see this situation being relevant to Mr Costella's JFK research.
You are certainly not 'gagged' in expressing views and opinions on politics or other related subjects.
For instance, in the public eye at the moment is the inquiry into the crash of a Royal Australian Navy helicopter, SeaKing SHARK 02 at Nias in APR 05. I have discussed this with many people in public forums. Because of my employment, there may be times that I cannot comment on aspects of the incident because they might be related to my work or information I have become aware of in an official capacity. In those cases, I don't comment - but it does not stop me talking about the subject.
This is what I find so strange about Mr Costella's statement. It would actually seem to contravene good security practice by drawing attention to the matter, rather than the opposite. It is almost like standing on a soapbox in a public square and saying loudly that you have access to highly sensitive & classified information which reveals astounding facts - but you can't talk about that.
-
APOLLO 15 - USE OF MULTIPLE SETS AND BACKDROPS 2
Similar story to all the others.
AS15-82-11082 was taken at the edge of Scarp Crater:
165:05:07 Scott: ...I'll get a pan from the rim of Scarp. And the rim is very, very soft. My boot sinks in a good - if I push on it - a good 4 inches. And the whole center part of the crater is just full of debris. Very angular, glass in the center. It's about, oh, I guess, 40 meters across and maybe 5 or 6 meters...No, not that much. 3 or 4 meters deep. And a slightly-raised rim. An ejecta blanket that goes out about one crater diameter, quite uniform. I don't see any rays. There are slickensides on some of the fragments. And we'll get to sampling them in a second here.165:06:04 Allen: Roger. (Long Pause)
[Fendell reaches the counter-clockwise pan limit. Jim is at Dave's seat changing film magazines. The crater - which is not actually Scarp Crater - is behind the Rover. As Dave indicated to Houston, he wasn't thinking about TV when he parked and, in fact, picked the worst possible orientation for coverage of their activities at the crater. They will be out of view - hidden by the seats - virtually the whole time they are at this station.]
[Fendell reverses direction.]
[Dave's pan (assembled by Dave Byrne) consists of frames AS15-82- 11066 to 11092.]
[Dave began the pan with a down-Sun picture, 11066. He is standing on the north rim of a 15-m diameter crater.]
[Frame 11067 is centered on Hill 305 and shows the blocky ejecta surrounding this very fresh crater. As at Apollo 17's Van Serg Crater, the ejecta here is almost all blocks of regolith (soil) compressed in the impact that dug the crater. The formal term for this compressed material is "regolith breccia". The informal term is "instant rock."]
[Frame 11069 shows the inbound Rover tracks just below center.]
[Frame 11078 shows the northeastern rim of the Station 9 crater.]
[Frame 11082 shows the bench on the eastern wall. Dave describes the bench at 165:07:51.]
[Frame 11085 shows the view across the middle of the crater toward Hadley Delta.]
[Frame 11087 is centered on St. George Crater.]
[At the right edge of frame 11090, we see Jim at the Rover.]
[Frame 11091 is centered on Jim. For reference, the Rover is pointed away from us, almost due west.]
[Frame 11092 ends the pan.]
Scarp Crater is about 1500m to the west of the LM. This map will show all the craters named during the Apollo 15 mission. 11082 is looking roughly south-east.
Look for the label "APOLLO 15 TARGET POINT' roughly in the middle of the image. Scarp crater is to the left of that label.
AS15-82-11057 was taken from about 125m west-northwest of the LM, looking south-east.
The 'hills' in the background are once more about 4-5km away.
The images are taken from different locations but because the 'hills' are quite distant, there is no apparent change in their size.
Grab your camera, and take some shots in similar settings with objects in the foreground and background. See what your photos tell you.
Edited to add:
I made this image up from a diagramme (Fig 5-2) in the Apollo 15 Preliminary Science Report. It better illustrates what is happening.

-
APOLLO 15 - USE OF MULTIPLE SETS AND BACKDROPS
This is simply Jack demonstrating his ignorance of photography and inability to understand perspective / distance.
The left-hand image in Jack's example (AS15-82-11057) was taken from the ALSEP site, which was about 125m from the LM. The other images were taken from near the LM.
Remember, those "hills" are over 4 kilometres in the distance. Those 'hills' rise from 3 to 5 km above the local surface!
(Source: Extract from Apollo 15 Preliminary Science Report)
It's an illusion, something Jack is very good at providing without telling you why it looks that way.
As always - don't take my word for it. Set up simulations of the images, and take some photographs yourself. See if what I am saying is correct or not.
-
SAME BACKGROUND - DIFFERENT SPUR
To begin, let's identify some features so we know what we are looking at.
We'll look at AS15-87-11748, the same image Jack has used. First, some comments from the ALSJ:
AS15-87-11748106:58:27 This frame is part of Dave's second SEVA pan and is centered on Silver Spur. Last Crater is in the foreground, with a smaller, fresh crater in its east wall, as can also be seen in a detail from Pan Camera frame 9809. Scan by David Harland.
SEVA is "Stand-up EVA", where Dave Scott stood up through the LM docking hatch (in the roof) and used the height advantage to survey the scene, and take photos.

AS15-87-11748 (reduced to 75% of original, annotated)
Silver Spur and Last Crater are marked.
Now look at AS15-87-11752
AS15-87-11752106:58:27 Frame from Dave Scott's second SEVA pan, centered on Mt. Hadley Delta with St. George Crater at the right and Silver Spur at the left. Scan by Kipp Teague.

AS15-87-11752 (reduced to 75% of original, annotated)
We can just see St George Crater on the right, which is also shown in Jack's image.
Now look at AS15-87-11753, the next frame in the pan:
AS15-87-11753This is a frame from Dave Scott's second SEVA pan, which he started at 106:58:27. The frame is a dramatic portrait of St. George Crater, on the north west flank of Mt. Hadley Delta. Scan by Kipp Teague.

AS15-87-11753 (reduced to 75% of original, annotated)
Note the time - 106 hrs 58 minutes.
Now look at an enlarged crop of pan4 which Jack has shown.

AS15.1472712pan4 (cropped, enlarged to 200% of original size, annotated)
Here is a wider view of the same image:

AS15.1472712pan4 (cropped, annotated)
You can just make out St George Crater. The crater has NOT gone - it's just a lot harder to see.
Why?
The pan was taken from just northeast of the LM at 147hrs 12 mins - some 40 hours after 11748. In that time the sun has risen about 21 degrees higher into the sky. The relief detail caused by the shadows is far less apparent.
The position has NOT changed, and the top image was NOT taken closer to Siver Spur. The top image was taken from the top of the LM, the pan from just to the northeast of the LM. St George Crater is behind the LM in the pan, but you can just make out the left-hand edge of the crater immediately to the left of the LM. Notice that it does actually line up with the reference marks in Jack's image - he just can't see it.
From the ALSJ:
[Dave is taking 500-mm photos of Mt. Hadley Delta, starting with the striking feature known as Silver Spur, named for Caltech geologist Lee Silver. These photos are AS15-84- 11250, 11251, 11252, 11253. Mini-pan assembled by Dave Byrne. Compare the view of Silver Spur in 11250 with the one shown in AS15-82-11121 which taken at Station 9A and has a similar viewing angle but a much higher sun elevation. See, also, a discussion of the appearance of Silver Spur in the Apollo 15 Preliminary Science Report.]BTW, these images do show some of the problems faced by the astronauts in judging size and distance. Have a look at Last Crater and Silver Spur again.
Now have a look at this EVA traverse map of Apollo 15:

Apollo 15 EVA Traverse Map
Last Crater is just near the landing site, but Silver Spur and St George Crater are actually some four and a half kilometres beyond it.
In the images, they look like they are right next to each other.
-
Please note, once again, that Jack does not try to refute the arguements I have placed against his claims.
-
DOING THE TWIST
Same thing again with the same images. Jim Irwin moved to different positions around the LM.
Try this for yourself at home; see if you get the same results, and please post them here. I'll try to take some similar images myself and post the results.
-
LEM DOES A TURNABOUT WITH SAME BACKGROUND
Once again, reference to the ALSJ and anything more than a cursory glace at the images explains it all.
I won't post the panoramas here because they are quite wide, however I do advise you look at the images yourself to confirm what I am telling you.
a15.1472712pan12, a 12 o'clock LM pan at the end of EVA-2 made up of images AS15-87-11785 through to AS15-87-11804.
a15.1472712pan4, a 4 o'clock LM pan at the end of EVA-2 made up of images AS15-87-11804 through to AS15-87-11821.
Pan 4 (the top image in Jack's post) was taken from northeast of the LM.
Pan 12 (the bottom image in Jack's post) was taken from west of the LM.
The ALSJ tells us:
147:27:12 Irwin: Just about finished, Joe.
[Jim is taking photographs in the vicinity of the LM, starting with four photos of the Solar Wind Collector (SWC), AS15-87- 11781 to 11784.]
[The SWC is west of the LM and, from that spot, Jim took a 12-o'clock pan (assembled by Dave Byrne). It consists of frames AS15-87- 11785) to 11804.]
[Frame 11785 is a down-Sun which shows Dave on the Rover near the ALSEP site. This picture was taken sometime after 147:19:33 but before 147:21:30. In frame 11787, readers should note the dark Rover tracks extending all the way to the ALSEP site. Note, as well, that the ground around the ALSEP that Dave and Jim disturbed with their feet is also dark. [Frames 11795, 11796, and 11797 are up-Sun photographs of the LM]
[Frame 87-11801 shows Rover tracks in the direction of Mt. Hadley Delta.]
[Jim then moved to a spot north of the LM and took a 4 o'clock pan. It consists of frames AS15-87- 11805 to 11821. David Harland has assembled the portion showing the LM.]
[in frame 11805, we see that Dave is still on the Rover. Frame 11818 shows the dramatic tilt of the LM. In 11821, Dave is at the front of the Rover positioning the high-gain antenna. Jim took this picture at about 147:24:53.]
So Jim Irwin was to the northeast of the LM and took the first panorama. We can see how the LM is tilted quite a lot, with the eastern leg on the downhill slope.
Jim then walks to the west of the LM to take the next panorama. As the LM is tilted down towards the east, we don't see any real apparent tilt. If you look carefully at the image though, you can see how the LM is tilted up compared to normal.
The ranges in the background are about a kilometre or two distant. Jims change in position makes very little difference to how they look in the panoramas. You can, however, notice the slight difference in shadowing due to the change in aspect.
You can also see that in pan4, to the left of the LM, there are footprints and further left LRV tracks. Further left of that is the Solar Wind Collector (SWC). Notice also that it is almost in line with the LRV in the distance.
If you now look at pan 12 you see footprints, the SWC, LRV tracks, then further left the LRV itself.
In pan12, look at the position of the SWC in relation to the left hand edge of the ranges in the distance, and the postion of the LRV in relation to the small mound.
Now in pan4, look at the SWC & LRV in relation to those same objects.
It's simply a change of aspect, something Jack continuously demonstrates he has problems trying to understand.
If anyone has trouble visualising the relationship of the objects in relation to distance and aspect, I'd be happy to draw up a mud map.
-
NASA DO(O)MED? CHAPTER 8
More lens flares, demonstrating Jack's seriously & fatally flawed understanding of photography. Either that, or his intent to misinform about photographic effects.
-
Thanks for your reply, Craig.
The previous images, as you mentioned, do show a similar effect. I just thought it was curious that the length of the artifact corresponded to the length of the Surveyor arm, and seemed to be a 'mirror image'. As I said, I simply do not know what has caused them - though I do know they are not a large crane on the lunar surface, or 'proof' that the images were taken on the Earth.
Thanks again, and more input on this matter is welcome.
-
NASA DO(O)MED CHAP 7
In this "claim" Jack has said:
Though these skies look solid black on the originals, computer enhancement shows lighter areas where pollutants in the air have reflected tiny amounts of light, proving that the photos were shot on EarthOnce again, this is totally incorrect and demonstrates Jack's 'selective' method of showing you images.
They are lens flares - all of them.
First, look at AS14-64-9173.

AS14-64-9173
You can plainly see the lens flares in the image; it is NOT 'black skies'. Check out all the other examples Jack has shown. No 'computer enhancement' is required to see the flares.
Now, look at these images; the links will take you to 'thumbnail' pages with multiple images on them.
Lunar & Planetary Institute, Apollo 12, Magazine X
Take note of images AS12-48-7038 through AS12-48-7040.
Take note of image AS12-48-7098.
Take note of image AS12-48-7101.
Lunar & Planetary Institute, Apollo 12, Magazine Z
Take note of images AS12-49-7186 through AS12-49-7188.
Take note of image AS12-49-7198.
Take note of image AS12-49-7201.
Take note of images AS12-49-7213 through AS12-49-7216, which is part of a pan sequence.
Take note of images AS12-49-7244 through AS12-49-7249, which is part of a pan sequence.
Take note of images AS12-49-7261 through AS12-49-7262, which is part of a pan sequence.
Take note of image AS12-49-7278.
Take note of images AS12-49-7294 through AS12-49-7302, which is part of a pan sequence.
Lunar & Planetary Institute, Apollo 14, Magazine LL
Take note of images AS14-64-9056 through AS14-64-9066, which is part of a pan sequence.
Take note of images AS14-64-9083 through AS14-64-9090, which is part of a pan sequence.
Take note of images AS14-64-9106 through AS14-64-9115, which is part of a pan sequence.
Take note of images AS14-64-9145 through AS14-64-9152, which is part of a pan sequence.
Take note of images AS14-64-9173 through AS14-64-9181, which is part of a pan sequence.
Lunar & Planetary Institute, Apollo 14, Magazine MM
Take note of images AS14-68-9400 through AS14-68-9404, which is part of a pan sequence.
Take note of images AS14-68-9420 through AS14-68-9424, which is part of a pan sequence.
Take note of images AS14-68-9435 through AS14-68-9439, which is part of a pan sequence.
Take note of images AS14-68-9482 through AS14-68-9487, which is part of a pan sequence.
These are the things that Jack doesn't want you to see. They show clear lens flares, and more importantly, how they increase in intensity as the camera is panned around towards the direction of the sun.
As always - don't take my word for it. Look at the images yourself. Examine them using the highest resolution scans available. Read the Apollo Lunar Surface Journal to understand the context they were taken in. Examine the preceding and following images. If you don't understand the effects, ask a photographic professional to explain the effects and give you an opinion on what has been claimed, and most importantly - decide for yourself. DON'T JUST ACCEPT AN EXPLANATION BECAUSE THEY TELL YOU THAT THEY ARE AN "EXPERT"!
-
NASA DO(O)MED CHAP 6
Here Jack uses a little deception to enhance his claims.
Firstly, Jack has NOT 'proved' that there was a "wrecker" in the previously mentioned image. He has CLAIMED there was one through very doubtful means - misuse of Photoshop or similar. I have previously asked Jack that if we were to submit his working image along with his resultant image (and thus claims) to the makers of Photoshop, and if they in their opinion said that it was the result of the misapplication of the Photoshop tools, would Jack withdraw his claim? He remains silent and refuses to answer - because he knows that it would be the most likely outcome. Therefore I will submit the images to the makers of Photoshop and ask their opinion anyway; stay tuned for results.
Secondly, Jack has 'colourised' the image to suit his own purposes. The image (AS12-48-7102) was a BLACK & WHITE image which Jack has shown in colour that he has added - and conveniently 'forgotten' to mention that fact.
Now, let's look at the image. Here is a crop of the hi-resolution image showing the section in question:

AS12-48-7102 (Hi-resolution, cropped)
So what is it? Short answer - I don't know. I do know it is not a toy crane...
What I do find intersting is that the length of the artifact matches the length of a section of the Surveyor extended arm. If we also draw a line along the shadow axis (marked in yellow below), we can see that it seems to be a mirror image of that section of the Surveyor extended arm (marked in red).

AS12-48-7102 (Hi-resolution, cropped, annotated)
I think it is some type of reflection. I can't say for sure because I don't have the necessary skills to positively determine that it is, but I think it is a reasonable guess.
I'd welcome comment on my guess from professional photographers and / or those with the necessary skills.
-
NASA DO(O)MED? CHAPTER 5
More of the same.
Look at the original images.
AS12-49-7319 look interesting, but it's some type of light leakage. The next image on the roll (7320) is fine, but the final four on the roll (7321-7324) are all badly damaged by being lightstruck.
As for the "pyramid" (as the "editor" calls it), look at a version that has not been 'photoshopped' to death:

AS12-49-7213
-
NASA DO(O)MED? CHAP 4
The image is the first in film magazine 89/WW. It suffers, like many first and last images, from light leaking in when the film magazine was changed on the lunar surface. Examples of this are shown below.
The "lights" which Jack claims are there are actually bits of the film strip which have been caught on the scan.
Once again, Jack ignores (and does not alert you to) the warning given about using these images from the Lunar & Planetary Institute:
"Because of all this processing, these catalog images should not be used for research purposes. They should only be used to select and identify images for use in a research project. Higher resolution products should be obtained for use in any scientific investigation(s)."
Examples:
http://history.nasa.gov/alsj/a15/10100079.jpg (AS15-86-11530)
http://www.lpi.usra.edu/resources/apollo/i...S11/39/5737.jpg (AS11-39-5737)
http://www.lpi.usra.edu/resources/apollo/i...S11/40/5970.jpg (AS11-40-5970)
http://www.lpi.usra.edu/resources/apollo/i...S12/46/6868.jpg (AS12-46-6868)
http://www.lpi.usra.edu/resources/apollo/i...S12/47/7021.jpg (AS12-47-7021)
http://www.lpi.usra.edu/resources/apollo/i...S12/48/7022.jpg (AS12-48-7022)
http://www.lpi.usra.edu/resources/apollo/i...S12/49/7172.jpg (AS12-49-7172)
http://www.lpi.usra.edu/resources/apollo/i...S12/49/7324.jpg (AS12-49-7324)
etc
etc
etc
-
NASA DO(O)MED? CHAP 3
Same again.
Ask yourself: are any of the images down-sun?
YES! Only one - AS14-64-9120. And look what Jack has done with it. Can you even SEE the astronaut in that image?
He's just brightend everything so that that it flares out. Don't believe me? Look at the original image.
Look at the shadow of the astronaut in the untampered version - it's all black.
Then look at the "image" Jack has next to it - the shadow is split in two, with massive pixelation going on.
All he has done is mutilated an image with Photoshop or similar until he sees "something".
Once more: do NOT trust the images Jack presents to you; look at the original images and determine for yourself what the truth is!
-
NASA DO(O)MED? CHAP 2
See previous post. A CLEAR indication of lens flare.
The standard and hi-resolution versions of AS14-64-9088 are available.
-
NASA DO(O)MED? CHAP 1
Oh come on!
Firstly, look at the image. The LM hatch (the "west side") is basically facing toward the camera.
Remember what I said earlier? The LM will always try to land 'down-sun' as much as possible. That's so the astronauts do not have the sun in their eyes, and they can use relief shadows to help judge the terrain.
The sun is "behind" the LM, out of frame.
The "dome" is a remanent of lens flare caused by the sun. The bottom section is not visible because the remanent is so faint and the lunar surface bright, so it washes out the flare. The upper portion is visible because it is highlighted against the dark sky.
"...Therefore any image shown in the black skies of the moon MUST REPRESENT REAL OBJECTS, or a DIRECT LIGHT SOURCE itself."
Real objects? Bull. xxxx. Utter bullxxxx. There have been numerous examples of lens (sun) flare previously.
Direct light source? Well, kinda. You are seeing lens flare. See my previous comment - numerous examples.
Additionally - what are you saying now Jack? Are you changing tack, Jack?
Are you saying the images WERE taken on the moon but NASA is trying to hide a massive lunar dome? Maybe left by aliens? Or is it a current construction by the Global Conspiracy of the New World Order?
Just what ARE you trying to say?
Now, let's have a look at the same image (AS15-82-11057) from the Apollo Image Gallery:

AS15-82-11057
That looks like a lens flare to me. You can see that it DOES extend below the horizon (see hi-res image to check for yourself).
Looks to me that Jack's image has been tampered with, altered so the lens flare isn't clear. Who did that? Was it Jack? Aulis? The unnamed Australian researcher? I don't know - but I do know that Jack's work is flawed to such a degree as to be totally unreliable.


Jack White's Aulis "Apollo Hoax" Investigation - A Rebuttal
in The Apollo Moon Landings
Posted
ONE OR TWO APOLLO 15 CRATERS?
This is an example where I can believe that Jack has genuinely made a mistake. The images to appear to confirm what he has said. It took a careful study of the images on the sequences to work out what has happened.
These images are both from Station 2 pan sequences.
AS15-85-11428 was taken first at 122 hrs 38 mins. It's known as the Station 2 first pan sequence.
AS15-85-11454 was taken later at 123 hrs 17 mins. It's known as the Station 2 second pan sequence.
The reason the crater "disappears" in 11454 is that Jim is standing on the rim of that crater for the first pan sequence, but has moved further away for the second pan sequence. In AS15-85-11454, the crater in the foreground of 11428 is hidden by a rise in the terrain (or should that be lunain? Seleain?).
WARNING! You should CAREFULLY examine not only the images mentioned above (hi resolution versions), but also hi resolution images both prior to and after the above images. Also read the Apollo Lunar Surface Journal about the astronaut activities at the time to place the images in context.
If you look at the crop I have done below of AS15-85-11428, you'll see I have marked some objects in order to give you some idea of orientation within the image.
AS15-85-11428 (hi resolution, cropped, enlarged to 150% of original, annotated)
Now look at the crop of AS15-85-11454. The same objects are labelled. I have also labelled, with a row of arrows, the crest of the crater lip / lunar dune. It is this crest that is preventing us from seeing the crater that was previously in the foreground. The crater is behind this crest and out of view.
AS15-85-11454 (hi resolution, cropped, enlarged to 150% of original, annotated)
In this next image (AS15-85-11454), you can see the bootprints where the previous image (AS15-85-11428) was taken from.
AS15-85-11454 (reduced to 60% of original, annotated)
This is a very good example of things that may not always be as they seem. A black & white photograph of lunar terrain with little or no contrast between similarly coloured and featured surfaces means a major feature can appear to disappear!